Light microscopy is one of the most fundamental and widely used techniques in biological and biomedical research. From observing cells and tissues to assisting in microsurgical procedures, the light microscope enables scientists and clinicians to visualize structures that are invisible to the naked eye. In this educational guide, we will explore what a light microscope is, how it works, its key components, and its real-world applications.
What Is a Light Microscope?
A light microscope is an optical instrument that uses visible light and lenses to magnify specimens—often up to 1000 times their original size. In its simplest form, it consists of a lens to magnify the specimen and a light source to illuminate it. However, modern light microscopes are far more complex, containing multiple precisely aligned lenses and optical elements that improve image clarity, magnification, and resolution.
Light microscopes are invaluable tools in research laboratories, clinical diagnostics, education, and even surgery.
Basic Principles of Light Microscopy
Light microscopy operates on a few core optical principles:
1. Illumination
Light generated from a source is focused onto the specimen using a condenser lens. Proper illumination—correct intensity, direction, and shape—is essential for producing high-quality images.
2. Magnification
Magnification occurs in two stages:
The objective lens produces a magnified, inverted image of the specimen.
The eyepiece (ocular lens) further magnifies this image for viewing by the eye.
In compound microscopes, which use multiple lenses, total magnification is calculated as:
Total magnification = Objective magnification × Ocular magnification
For example:
40× objective × 10× ocular = 400× total magnification
3. Resolution
Resolution refers to the smallest distance between two objects that can still be distinguished as separate. Higher resolution means clearer, sharper images. Resolution depends heavily on the numerical aperture (NA) of the objective lens and the wavelength of light used.
Main Components of a Light Microscope
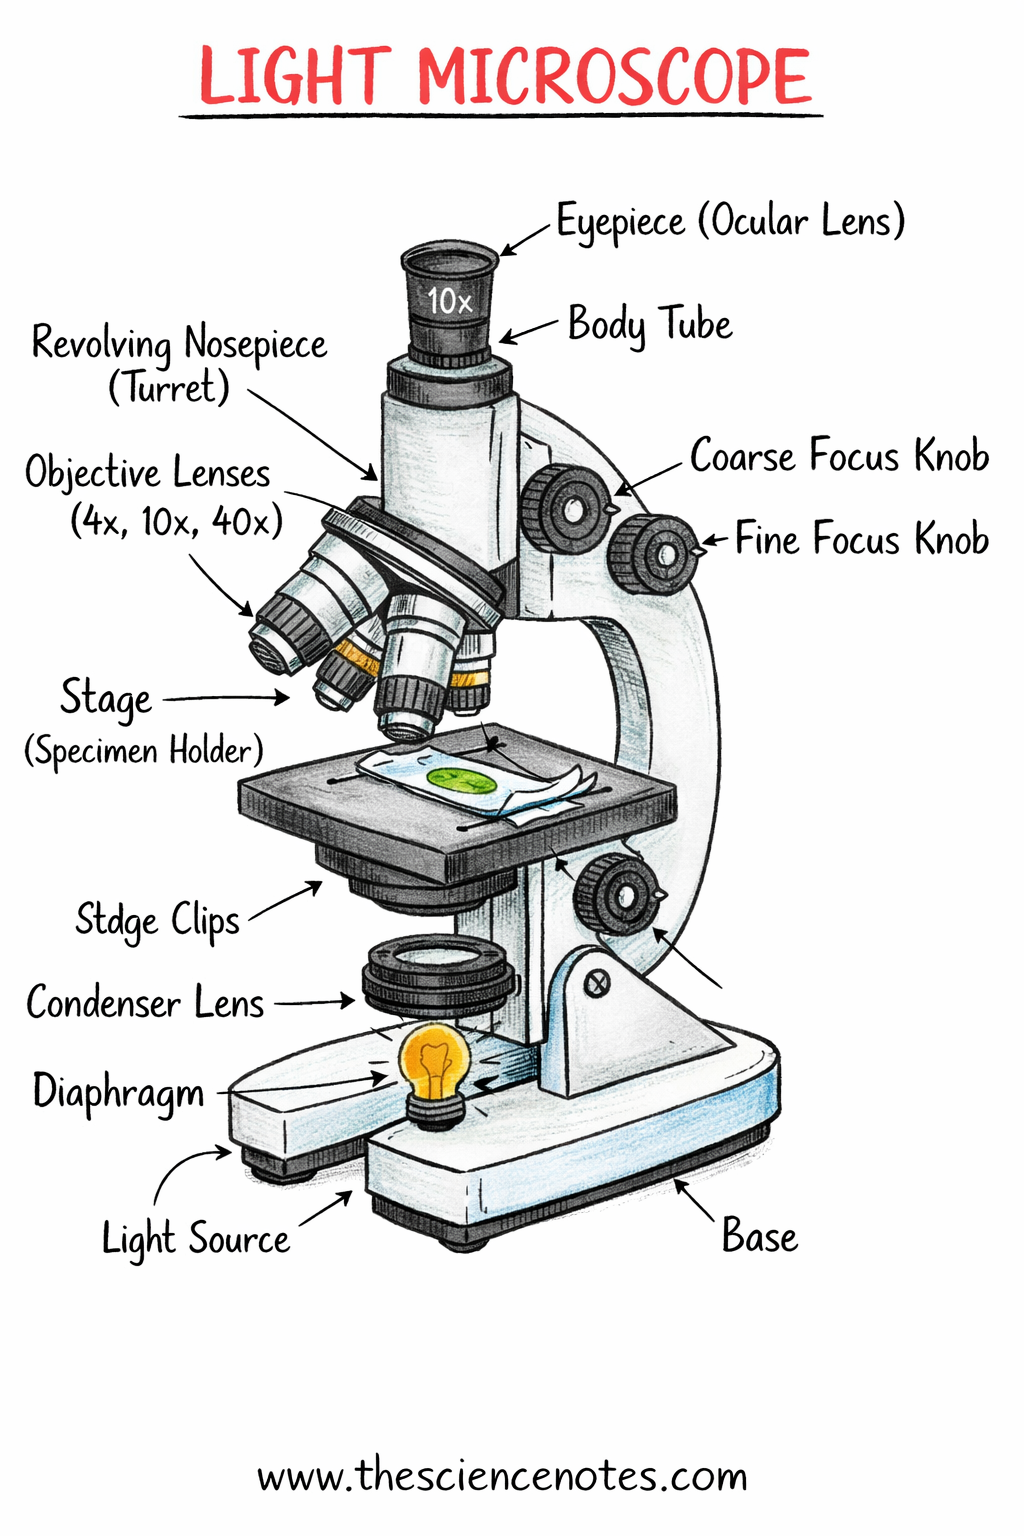
Understanding the parts of a light microscope is essential for effective use and image acquisition.
Objective Lenses
Objectives are the most critical components, responsible for most of the magnification and resolution. They are mounted on a rotating nosepiece and are parafocal, meaning the specimen remains in focus when switching objectives.
Each objective is labeled with:
Magnification
Numerical aperture (NA)
Immersion medium (air, oil, etc.)
Coverslip thickness
Working distance (distance from lens to specimen)
Eyepieces (Ocular Lenses)
Eyepieces typically provide additional magnification (commonly 10×) and deliver the image to the viewer’s eye. Some eyepieces include a reticle, a scale that helps estimate object size under different magnifications.
Stage and Specimen Holder
The stage supports the specimen slide, while stage clips or holders secure it in place. The stage allows precise movement in the x and y directions to locate the region of interest.
Light Source and Optical Path
The illumination system includes:
A low-voltage halogen bulb for adjustable light intensity
Filters to modify light quality
A field diaphragm to control the illuminated area
A condenser and aperture diaphragm to focus and shape the cone of light reaching the specimen
Focus Knobs
Coarse adjustment knob: Used for initial focusing at low magnification
Fine adjustment knob: Used for precise focusing, especially at higher magnifications
Numerical Aperture and Resolution
The numerical aperture (NA) measures an objective’s ability to gather light. High-NA objectives collect light at wider angles, allowing better resolution and image detail. Resolution improves as NA increases and can be mathematically related to the wavelength of light used.
In simple terms:
Higher NA = better resolution
Lower NA = less detail
How to Use a Light Microscope: Step-by-Step
Place the specimen slide on the stage and secure it.
Turn on the light source and select the lowest power objective.
Use the coarse adjustment knob to bring the specimen into rough focus.
Use the fine adjustment knob to sharpen the image.
Locate and center the region of interest by moving the stage.
Switch to higher magnification objectives as needed.
Adjust the field diaphragm so it sits just outside the field of view.
Match the condenser aperture to the objective’s numerical aperture.
Refocus using only the fine adjustment knob.
Capture images once optimal focus and illumination are achieved.
Applications of Light Microscopy
Light microscopy has nearly limitless applications, including:
Viewing stained and unstained cells and tissues
Resolving fine structural details
Educational demonstrations in biology and medicine
Surgical microscopy, such as microscale procedures during transplantation
Developmental biology studies using dissecting microscopes
Advanced techniques like microinjection and somatic cell nuclear transfer using inverted microscopes
Specialized configurations—such as stereoscopic, dissecting, inverted, and surgical microscopes—are designed to meet specific experimental and clinical needs.
Conclusion
The light microscope is a cornerstone of modern science and medicine. By combining simple optical principles with precisely engineered components, it allows researchers to explore the microscopic world with remarkable clarity. Whether used in a classroom, research lab, or operating room, light microscopy continues to play a vital role in advancing scientific discovery and medical innovation.
Understanding how a light microscope works, its components, and proper operation is essential for anyone studying or working in the life sciences.