The Enzyme-Linked Immunospot (ELISPOT) assay represents a pinnacle of immunological technique, blending the specificity of enzyme-linked immunosorbent assays (ELISA) with the granular resolution of single-cell analysis. Since its inception, this method has transitioned from a niche laboratory tool to the “gold standard” for monitoring immune responses in clinical trials, vaccine development, and infectious disease research.
This article provides an in-depth exploration of the ELISPOT assay, moving from its historical foundations to a detailed, step-by-step laboratory protocol, and finally to its modern applications in dual-color and multi-analyte detection.
1. Introduction to ELISPOT Technology
The ELISPOT assay is a standardized, highly reproducible method used to detect cellular immune responses. At its core, the assay utilizes an ELISA-based chemical framework to detect protein secretions from individual cells. Researchers visualize these secretions as “spots” on a membrane; hence the name ELISPOT.
Historical Context and Evolution
Czerkinsky and colleagues first described ELISPOT in 1983. The original application involved the enumeration of B cell hybridomas producing antigen-specific immunoglobulins. This development marked a significant breakthrough because it allowed scientists to see exactly how many cells in a population were active, rather than just measuring the total concentration of antibody in a sample.
Following the success with B cells, the same research group adapted the assay to measure the frequency of cytokine-producing T lymphocytes. This evolution transformed ELISPOT into the powerhouse it is today, particularly for measuring antigen-specific T cell immunity in candidates for vaccines against HIV, Tuberculosis, and Malaria.
Why Single-Cell Resolution Matters
Typically, clinicians assess immune responses by measuring serum titers of antigen-specific antibodies via ELISA. However, ELISA has a major limitation: it measures the “bulk” protein concentration. This type of analysis may fail to include memory B cells, which can persist in the body even when serum antibody levels are undetectable.
Because circulating memory B cells are vital for rapid protection during pathogen re-exposure, the ability to detect these specific cells at the single-cell level is critical. Consequently, modern research dictates that to clearly assess immune memory, both ELISA (for bulk titers) and ELISPOT (for cell frequency) should be used in tandem.
2. Advantages of the ELISPOT Assay
The ELISPOT assay is favored in both academic and pharmaceutical research for several distinct reasons:
Extreme Sensitivity: The assay can detect a single activated cell among 300,000 cells. This level of sensitivity far superior to traditional ELISA and even rivals flow cytometry in specific contexts.
Simplicity: While the protocol requires precision, the steps remain relatively straightforward. It does not require the heavy technical expertise or expensive laser-based equipment associated with high-parameter flow cytometry.
High Throughput: Because it utilizes a 96-well plate format, researchers can screen hundreds of samples or various dilutions simultaneously.
Functionality: Unlike methods that simply detect the presence of a protein within a cell, ELISPOT proves functionality. It confirms that the cell is actively secreting the protein of interest into its environment.
Quantitative and Qualitative Data: It quantifies the number of secreting cells and, through spot size and intensity analysis, provides a relative estimate of how much protein each individual cell is producing.
3. The Core Mechanism: How it Works
The ELISPOT assay uses a specialized 96-well plate. Instead of a plastic bottom, these wells contain a PVDF (polyvinylidene fluoride) membrane.
The “Sandwich” Method
The assay relies on a “sandwich” of antibodies:
Capture Antibody: Researchers coat the membrane with a high-affinity antibody specific to a target protein (e.g., IFN-γ or an antibody).
Cell Incubation: Scientists add live cells (like splenocytes or PBMCs) with a stimulant. As the cells secrete the target protein, the antibodies on the membrane directly beneath the cell capture it immediately.
Detection Antibody: After washing away the cells, the technician adds a biotinylated detection antibody. This antibody recognizes a different epitope of the same protein.
Enzyme Conjugate: Streptavidin-horseradish peroxidase (SAv-HRP) is added, which binds to the biotin.
Substrate Addition: A substrate (like AEC) is added. The enzyme converts the substrate into a colored, insoluble precipitate. This precipitate forms a permanent spot on the membrane at the original location of the secreting cell.
4. Materials and Equipment Requirements
To perform a successful ELISPOT, a laboratory must be equipped with specific tools and reagents. Precision is the difference between clear results and “messy” data.
Essential Reagents
Sterile PBS: Used for washing and as a base for buffers.
Coating Buffer: Often a Carbonate buffer or sterile PBS.
Assay Diluent: Typically 10% Fetal Bovine Serum (FBS) in PBS.
Cell Culture Medium: RPMI 1640 supplemented with 10% FBS, penicillin/streptomycin, and L-glutamine.
Wash Buffer: PBS containing 0.05% Tween-20 (to reduce non-specific binding).
AEC Substrate: 100 mg AEC (3-amino-9-ethyl-carbazole) dissolved in 10 mL DMF (N,N-Dimethylformamide).
Necessary Equipment
Laminar Flow Hood: To maintain sterility during cell handling and plate coating.
Humidified Incubator: Set at 37°C with 5% $CO_2$.
Automated ELISPOT Reader: A specialized camera and software system (e.g., CTL ImmunoSpot) used to count spots and analyze their morphology.
Multichannel Pipettors: Essential for consistent plating across 96 wells.
5. Step-by-Step Laboratory Protocol: IFN-γ Detection
The following protocol is a standard lab exercise for detecting IFN-γ secreting splenocytes from mice. IFN-γ (Interferon-gamma) is a critical cytokine produced by T cells and Natural Killer (NK) cells during an immune response.
Phase I: Plate Coating (Day 1)
Sterility: Perform all steps in a laminar flow hood.
Antibody Dilution: Dilute the purified anti-cytokine capture antibody to a final concentration of 0.5-4.0 µg/mL in sterile coating buffer. (Note: For IFN-γ, a concentration of 5 µg/mL is often recommended).
Dispensing: Transfer 100 µL of the antibody solution to each well of the ELISPOT plate.
Incubation: Seal the plate to prevent evaporation and incubate overnight at 4°C.
STEP II: Blocking and Cell Plating (Day 2)
Emptying: Invert the plate over a sink and flick it to remove the coating solution. Blot it on sterile paper towels.
Blocking: Add 200 µL of cell culture medium to each well. This “blocks” any remaining sites on the membrane to prevent non-specific protein binding.
Incubation: Incubate the plate for 2 hours at 37°C.
Stimulant Preparation: Prepare a 2X mitogen solution (e.g., PMA at 50 ng/mL and Ionomycin at 1 µM).
Cell Preparation: Prepare the target cells (splenocytes) at a concentration of 2 x 10⁶ cells/mL.
Serial Dilution: * Add 200 µL of the cell stock to the top row.
Subsequently, add 100 µL of medium to the rows below.
Perform a 2X serial dilution by transferring 100 µL down the plate. This ensures that at least one row will have a readable number of spots.
Activation: Add 100 µL of the 2X mitogen solution to the experimental wells. Add 100 µL of plain medium to control wells.
Main Incubation: Incubate at 37°C for 20–48 hours.
Note: 24 hours is usually enough for IL-2, while 48 hours is better for IFN-γ.
CRITICAL: Do not move the plate during this time. Vibrations can cause cells to shift, resulting in “smudged” or “comet-shaped” spots rather than clean circles.
Phase III: Detection (Day 3 or 4)
Washing: Invert the plate to remove cells. Wash the plate 5 times with Wash Buffer (PBS-Tween). After this point, sterility is no longer required.
Primary Detection: Add 100 µL of biotinylated detection antibody (2 µg/mL). Incubate for 2 hours at room temperature or overnight at 4°C.
Secondary Detection: Wash the plate 5 times again. Add 100 µL of Streptavidin-HRP. Incubate for 1.5–2 hours at 37°C.
Substrate Development: * Wash the plate 5 times.
Immediately add 100 µL of AEC substrate.
Monitor the plate every few minutes as spots appear as small red circles.
Stopping the Reaction: Once spots are clear, rinse the plate thoroughly with distilled water to stop the enzymatic reaction.
Drying: Remove the plastic under-tray and allow the plate to air dry overnight in the dark.
6. Data Acquisition and Quality Control
Once the plate is dry, the spots must be counted. While manual counting under a dissecting microscope is possible, it is prone to human error and bias.
Using an Automated Reader
Modern labs use automated systems like the CTL ImmunoSpot Reader. These systems use high-resolution cameras to take a digital image of each well.
Counting: The software identifies spots based on size, circularity, and color intensity.
Normalization: Data is usually expressed as SFC (Spot Forming Cells) per $10^6$ cells.
Exclusion: Quality control software allows researchers to exclude “artifacts” such as hair, dust, or edge effects.
Statistical Interpretation
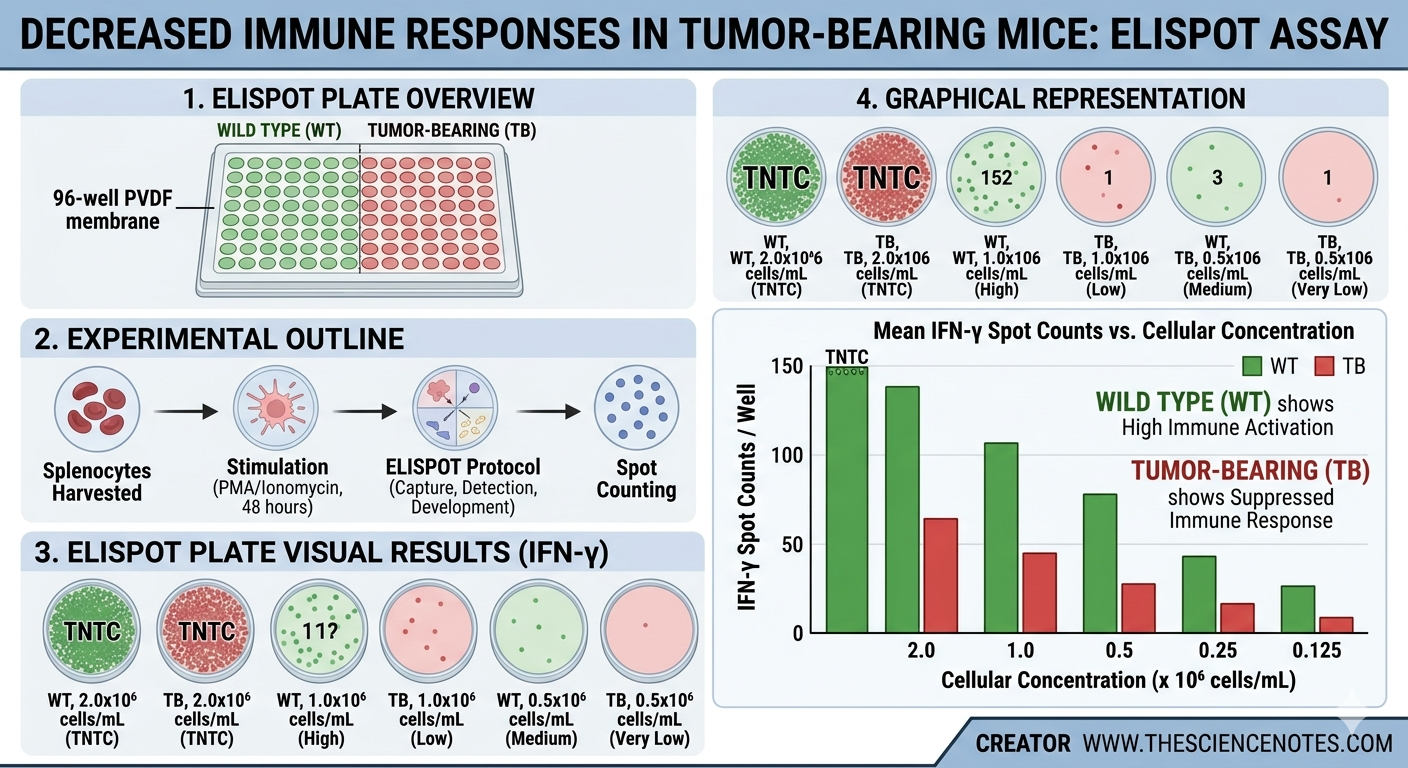
In a typical experiment comparing healthy (wild-type) and diseased (e.g., tumor-bearing) subjects:
Wild-type: Shows a high frequency of IFN-γ spots upon stimulation.
Tumor-bearing: Often shows a significant reduction in the number of spots. This indicates that the disease has suppressed the T cell’s ability to respond to stimulants.
7. Troubleshooting and Optimization
The ELISPOT is a sensitive assay, meaning small errors can lead to poor data.
| Problem | Potential Cause | Solution |
| TNTC (Too Numerous To Count) | Cell density is too high. | Use a more aggressive serial dilution; target ~50 spots/well. |
| Fuzzy/Smudged Spots | Plate was moved during incubation. | Keep the incubator isolated; avoid opening the door. |
| High Background Color | Inadequate washing or over-development. | Increase wash steps; monitor substrate development more closely. |
| No Spots in Positive Control | Stimulant (PMA/Ionomycin) is degraded. | Use fresh stimulants and check cell viability. |
Technical Tip: The PVDF Membrane
The PVDF membrane is much more delicate than the plastic in a standard ELISA plate. Never use an automated plate washer, as the high-pressure jets can puncture the membrane. Hand-washing with a squeeze bottle is the standard and safest approach for manual handling.
8. Broad Applications in Modern Research
The ELISPOT assay is not limited to just one cytokine or one cell type. Its applications have expanded significantly over the last decade.
1. Vaccine Efficacy Trials
ELISPOT remains the primary tool for determining if a vaccine has successfully “primed” the immune system. By taking PBMCs from a vaccinated patient and exposing them to the vaccine antigen, researchers can see exactly how many T cells have been “taught” to recognize the pathogen.
2. Monitoring Autoimmunity
In diseases like Type 1 Diabetes or Multiple Sclerosis, clinicians use ELISPOT to track the frequency of autoreactive T cells—those that are attacking the body’s own tissues.
3. Allergy Research
Furthermore, researchers use ELISPOT to detect IL-4 or IL-13 producing cells. These cytokines serve as primary markers for Th2-mediated allergic responses.
4. Cancer Immunotherapy
When testing “checkpoint inhibitors” or cancer vaccines, ELISPOT helps determine if the treatment successfully increases the number of tumor-infiltrating lymphocytes (TILs) capable of attacking cancer cells.
9. The Future: Dual-Color and Fluorescent ELISPOT
The most exciting development in this field is the FluoroSpot assay. By using fluorescently labeled detection antibodies rather than enzyme-linked ones, researchers can detect multiple cytokines simultaneously.
Specifically, a researcher can use a green fluorophore for IFN-γ and a red fluorophore for IL-2.
Green Spots: Cells producing only IFN-γ.
Red Spots: Cells producing only IL-2.
Yellow/Dual Spots: “Polyfunctional” cells producing both cytokines.
Polyfunctional cells are highly sought after in vaccine research. They are often associated with superior protection against pathogens compared to cells that produce only a single cytokine.
10. Summary and Conclusion
In conclusion, the Enzyme-Linked Immunospot (ELISPOT) assay remains an essential pillar of immunological research. Its ability to provide a functional, single-cell “snapshot” of the immune system is unparalleled. Whether it is used to quantify the protective memory B cells following a vaccination or to assess the suppressive environment of a tumor, ELISPOT provides the quantitative data necessary for scientific advancement.
By mastering the nuances of plate coating, cell titration, and careful detection, researchers can harness this “gold standard” to unlock deeper insights into the complex world of cellular immunity. As we move toward multi-color FluoroSpot technologies, the resolution of our “immune window” will only continue to sharpen, paving the way for the next generation of life-saving medical interventions.